

Most people consider hardwood flooring installation to be an advanced project usually done by professional installers. However, it is not too challenging for advanced DIYers who know the common pitfalls to avoid.
That said, not every DIYer has enough knowledge to finish the project successfully. It requires careful planning, essential tools, important know-how, and expert tips to install the hardwood flooring. If you are one of the brave souls undertaking this daunting project, the following tips will help you achieve your goals.
Hardwood Flooring Installation: 5 Tips

Hardwood flooring is currently in demand as it excels in durability while adding a warm touch to the space. Seek help from professional installers if you are not aware of the process.
Moreover, people who know the ins and outs of DIY hardwood flooring installation will find these tips helpful.
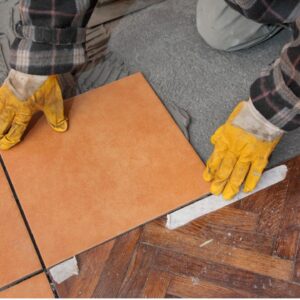
Have the Right Tools
It does not require fancy equipment, the majority of tools required will already be present in the homeowner’s toolbox. If the homeowner lacks essential tools, they can buy or rent hardwood flooring installation tools including saws, pry bars, a measuring tape, a square, cleat-nailer, finish nailer, compressor, and floor installation kits.
The installer must use all the equipment following the safety guidelines. Invest in safety glasses, a safety mask, work gloves, knee pads, and ear protection to safely install hardwood floors.
Choose the Installation Method
Generally, people choose from either two fitting methods; engineered and solid hardwood flooring. The installer can pick any installation method depending on the place of installation and the thickness and width of the hardwood boards.
Both fitting methods have their own pros and cons, it is better to consider the opinion of an expert when picking one. Solid hardwood flooring uses nails and staples for fitting while engineered flooring adopts mechanical fitting for hardwood fastening.
Acclimation
Acclimation is required to allow the movement of wood with the changing temperatures. Hardwood flooring expands and contracts with the change in surrounding conditions, humidity, moisture, and temperature.
Leave a 1/4″ gap within the perimeter while installing to allow wood movement and prevent gaps and cupping. Once the hardwood boards have arrived, let them acclimate by spreading out the boxes and running the AC or heat at normal levels.
Subfloor Preparation
Examine the subfloor to confirm if it is clean, flat, or have to add a new one. Installing a hardwood floor without preparing the subfloor first would lead to uneven installation.
Use a spirit level to level the subfloor before the installation and clean it to get rid of dust, dirt, chemicals, and adhesives. Also, ensure the moisture content is 16%MC or lower.
Install Hardwood Boards
Avoid installing crooked hardwood boards in the first row, instead, choose the straightest hardwood boards for the first two rows. Use a pneumatic floor nailer to nail the first row through the face of the board and the next one through the tongue. Similarly, progress through the space by installing more hardwood boards.


Commented Posts